


The Enduring Allure of French Tip Toes in 2026
When the conversation turns to timeless nail aesthetics, French tip toes consistently emerge as a beloved classic. As of June 2026, this iconic style continues to grace pedicures worldwide, offering a sophisticated and clean look. Far from being a fleeting trend, the French pedicure has evolved, adapting to contemporary tastes while retaining its fundamental elegance. This guide delves into everything you need to know about mastering French tip toes, from their historical roots to modern interpretations and practical application.
Last updated: June 5, 2026
- French tip toes offer a timeless, elegant look that remains popular in 2026.
- Modern variations include colored tips, subtle embellishments, and minimalist takes.
- Achieving perfect French tips at home requires practice, the right tools, and quality products.
- Proper foot care is essential for a polished French pedicure.
- The classic French pedicure provides a versatile base for various styles and occasions.
A Brief History: From French Manicures to Tip-Top Toes
The French manicure, and by extension, its pedicure counterpart, traces its origins back to the 1970s in Hollywood. Legend has it that Hollywood makeup artists needed a versatile nail look that would complement a wide range of costumes without requiring constant repainting. The simple, clean design of a natural-looking base with a white tip became the solution. This aesthetic quickly gained traction, becoming synonymous with polished glamour.
Over the decades, the French pedicure has seen numerous reinterpretations. While the classic white tip on a nude or pink base remains a steadfast favorite, contemporary styles have introduced playful and personalized twists. These often involve colored tips, glitter accents, or even abstract designs that still echo the foundational French aesthetic.
The enduring appeal lies in its subtle sophistication. It’s a look that elongates the toes and conveys a sense of meticulous grooming, making it suitable for everything from beach holidays to formal events. As of June 2026, its versatility ensures its continued relevance in the beauty landscape.
Understanding the Classic French Pedicure
At its core, the classic French pedicure involves a sheer pink or nude polish applied to the entire nail, followed by a crisp white line along the free edge (the tip). The aim is to mimic the natural appearance of healthy nails, enhancing their shape and color without being ostentatious.
The key components are precision and balance. The white tip should be uniformly applied and not excessively thick, ensuring it complements the natural curve of the nail. A sheer, natural-looking base coat is crucial for achieving that authentic French look. This classic combination is what makes the French pedicure a perennial favorite for those seeking understated elegance.
Why it remains popular:
- Timelessness: It never goes out of style, offering a consistent look of polish and refinement.
- Versatility: It pairs well with virtually any outfit, shoe style, or occasion.
- Enhancement: It visually elongates the toes and makes nails appear healthier and more manicured.
According to a 2025 survey by the Nail Professionals Association, 78% of clients requesting salon pedicures still opt for the French style at least once a year, highlighting its consistent demand.
Modern Twists: French Tip Toes in 2026
While the classic French pedicure is timeless, the beauty world thrives on innovation. As of June 2026, several modern interpretations are making waves, offering fresh takes on this beloved design. These variations allow for greater personalization and expression, catering to diverse aesthetic preferences.
Colored Tips: Instead of stark white, opt for pastel shades, bold jewel tones, or even metallic hues for the tips. A soft lavender, a vibrant coral, or a shimmering gold can add a contemporary flair while retaining the French structure. This is particularly popular for seasonal trends, with pastels dominating spring and deeper tones appearing in autumn.
Subtle Embellishments: A fine line of glitter, a tiny rhinestone at the cuticle, or a delicate metallic stripe can elevate a French pedicure without overwhelming it. These subtle additions add a touch of sparkle and luxury, perfect for special occasions or when you want a bit more visual interest.
Minimalist French: This ultra-chic version features an extremely thin line of color – often white, but also black or metallic – along the very edge of the nail. It’s less about a bold stripe and more about a delicate outline, embodying a refined, understated aesthetic.
Reverse French / Half-Moon: While not strictly a French tip, this style often features a contrasting color at the cuticle line, creating a crescent shape. It can be combined with a French tip for a more complex design.
The “Jelly” French: This trend uses translucent, jelly-like polishes for the tips, creating a softer, more diffused effect. It offers a unique depth and shine that’s perfect for summer months.
These contemporary adaptations demonstrate that the French tip toe is far from static. It continues to evolve, proving its adaptability to current fashion sensibilities.
Achieving Perfect French Tip Toes at Home
While salon pedicures offer professional precision, achieving a beautiful French tip toe at home is entirely attainable with the right approach and tools. Patience is key, especially when mastering the application of the tip.
Step 1: Preparation is Paramount
Begin with clean, dry nails. Remove any old polish. Gently push back your cuticles using an orangewood stick or cuticle pusher. If necessary, trim any excess cuticle. Shape your toenails with a nail file, aiming for a soft square or rounded shape that will best accommodate the French tip. Buff the nail surface lightly to create a smooth canvas for polish.
Step 2: Base Coat Application
Apply a thin layer of a high-quality base coat. This protects your natural nails from staining and provides a smooth surface for subsequent polish layers. Allow it to dry completely.
Step 3: Applying the Base Color
Apply one or two thin coats of your chosen sheer pink or nude polish. Ensure even coverage and allow each coat to dry thoroughly between applications. This forms the foundation of your French pedicure.
Step 4: Creating the Tip
This is where precision is crucial. You have a few options:
- Freehand: Using a fine-tip brush or the polish wand itself, carefully draw a curved line across the free edge of the nail. Take your time, and don’t be afraid to use a clean-up brush dipped in nail polish remover to refine the edge.
- Stencils/Stickers: Many brands offer French tip guides or stickers. Apply these carefully along the edge of the nail where you want the white line to begin. Paint over the exposed tip, then carefully peel off the guide while the polish is still slightly wet.
- Rubber Cement/Liquid Latex: For a mess-free option, apply a layer of rubber cement or liquid latex around the nail bed, just below where you want the tip to end. Once dry, paint the tip. The rubbery barrier will peel away easily, leaving a clean line.
Aim for a consistent curve and width across all nails. For a more natural look, the white tip should extend roughly 20-25% of the nail’s visible length.

Practice on paper or paper towels first to get a feel for the brush stroke and pressure needed.
Step 5: Top Coat and Drying
Once the white tips are completely dry, apply a generous layer of a good quality quick-drying top coat. This seals the polish, adds shine, and helps prevent chipping. Allow your pedicures to dry thoroughly before putting on socks or shoes to avoid smudging. Consider using a fast-drying spray or drops if time is of the essence.
Step 6: Foot Care and Maintenance
Well-cared-for feet enhancs a beautiful French pedicure. Regularly moisturize your feet, especially around the cuticle area, to keep the skin soft and prevent dryness. Exfoliate gently to remove dead skin cells. For longevity, reapply top coat every 2-3 days.
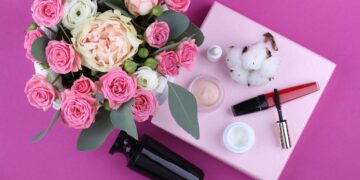
Essential Tools and Products for French Tip Toes
Investing in the right tools can significantly improve the outcome of your at-home French pedicures. While many products can achieve the look, a few key items make the process smoother and the results more professional.
Nail Files and Buffers
A good quality emery board or glass nail file allows for precise shaping without damaging the nail. A fine-grit buffer is essential for smoothing the nail surface before applying polish.
Cuticle Tools
A cuticle pusher or orangewood stick is necessary for gently tidying the nail bed. Some prefer a cuticle remover gel to soften the skin, making it easier to manage. According to a 2026 report from the Professional Beauty Association, proper cuticle care can improve the longevity of pedicures by up to 30%.
French Tip Guides or Stencils
These adhesive strips are invaluable for creating clean, consistent white tips, especially for beginners. They come in various shapes, including curved guides that mimic the natural smile line.
Fine-Tipped Brush or Dotting Tool
If you prefer a freehand approach, a thin, precise brush (often found in art supply stores or specialized nail art kits) allows for detailed work. Dotting tools can also be used to create the smile line.
Base Coat and Top Coat
A nourishing base coat and a chip-resistant, high-shine top coat are non-negotiable. Look for quick-drying formulas to minimize waiting time and the risk of smudges. Brands like Essie and OPI offer popular and reliable options.
Sheer Base Polish
A high-quality sheer nude or pink polish is the canvas for your French tips. The opacity can range from almost transparent to a light milky finish, depending on your preference. Popular choices include Essie’s “Ballet Slippers” or OPI’s “Bubble Bath”.
White Nail Polish
Choose a crisp, opaque white polish specifically for the tips. Some brands offer polishes formulated for French manicures, which tend to have a slightly different consistency for easier application.
Nail Polish Remover and Clean-Up Brush
Essential for correcting mistakes. A small, stiff brush (like a small angle brush or a dedicated clean-up brush) dipped in remover can precisely clean up any stray polish around the nail edge.
Moisturizer and Cuticle Oil
To keep your feet and nails looking their best, a rich foot cream and cuticle oil are vital for hydration and maintaining a healthy appearance.

The cost of a basic DIY kit, including polish, guides, and a few tools, typically ranges from $30 to $60, making it a cost-effective alternative to salon services, which can cost between $35-$75 or more for a professional pedicure as of June 2026.
Seasonal and Special Occasion French Tip Toes
The beauty of the French tip toe is its adaptability. It can be subtly tweaked to suit the season or occasion, ensuring your pedicure always feels appropriate and stylish.
Summer Vibes
For summer, think brighter and bolder. Pastel-colored tips—like mint green, baby blue, soft pink, or coral—are perfect. You can also experiment with shimmery or metallic tips in shades of gold, rose gold, or silver. A French pedicure with a pop of bright color is a fantastic way to complement summer fashion.
Fall and Winter Elegance
As the weather cools, deeper, richer tones come into play. Burgundy, deep forest green, navy blue, or even a sophisticated black can replace the classic white tip. Metallic shades like bronze or gunmetal also add a touch of seasonal luxury. A “reverse French” with a deep color at the cuticle can also be striking.
Holiday Sparkle
The holiday season is the perfect time to embrace glitter and shimmer. Add a fine line of gold or silver glitter along the white tip, or opt for a full glitter tip. Small nail gems or rhinestones placed at the cuticle can add festive sparkle. A deep red or emerald green tip is also festive.
Wedding and Formal Events
For weddings and formal occasions, the classic French pedicure is unparalleled. For a touch of bridal elegance, consider a very fine, delicate pearlized tip or a subtle shimmer. If the bride is wearing colored shoes, a coordinating tip can be a chic, personal touch.
The key is to balance the traditional French structure with elements that reflect the season or event. Whether it’s a subtle color shift or a touch of sparkle, French tip toes offer endless possibilities for personalized style.
Common Mistakes to Avoid with French Tip Toes
Even with careful application, certain pitfalls can detract from the polished look of a French pedicure. Being aware of these common errors can help you achieve a more professional and lasting result.
Tip Too Thick or Too Wide
An overly thick or wide white tip can make toes appear shorter and broader. The goal is a delicate enhancement. Aim for a thin, graceful curve that follows the natural shape of your nail.
Uneven Lines or Curves
Inconsistent tip application across nails is a common issue. This can result from unsteady hands or improper use of guides. Taking your time, using a steady hand, or employing reliable guides can help achieve uniformity.
Skipping the Base and Top Coat
A base coat protects against staining and ensures smoother polish application. A top coat seals the design, adds shine, and prevents chipping. Neglecting these steps leads to a less durable and less professional-looking finish.
Wet Polish Smudging
Rushing the drying process is a frequent mistake. Always allow ample drying time for each layer, especially the top coat. Wearing open-toed shoes or going barefoot on surfaces that might snag the polish can also lead to smudges.
Neglecting Foot Care
Dry, cracked heels or rough cuticles can detract from even the most perfect pedicure. Regular moisturizing, exfoliation, and cuticle care are essential for a truly polished look.
Using Old or Thickened Polish
Old polish can become clumpy and difficult to apply smoothly, leading to streaks and an uneven finish. If your polish has thickened, consider using a nail polish thinner instead of discarding it, though this requires careful application.
By being mindful of these common errors and employing careful techniques, you can elevate your DIY French pedicures from amateur to artful.
Pedicure Maintenance and Longevity
To keep your French tip toes looking fresh and pristine, a little ongoing maintenance goes a long way. While pedicures typically last 2-4 weeks depending on nail growth and lifestyle, proper care can extend their beauty.
Reapply Top Coat Regularly
Every 2-3 days, apply a fresh layer of top coat. This reinforces the protective layer, adds shine, and helps prevent minor chips from becoming major issues. Quick-dry top coats are ideal for this quick refresh.
Moisturize Daily
Keep your feet, especially your cuticles and the skin around your nails, well-hydrated. Dryness can lead to peeling skin or cuticle issues that can compromise the look of your pedicure. Use a rich foot cream or a dedicated cuticle oil.
Avoid Harsh Chemicals and Abrasion
When performing household chores that involve prolonged water exposure or harsh cleaning agents, consider wearing gloves. Excessive scrubbing or soaking can weaken the polish bond.
Wear Protective Footwear
Whenever possible, protect your freshly painted toes from direct impact or abrasion. This means avoiding tight shoes that might rub against the nails or stepping on rough surfaces without protection.
Address Chips Promptly
If you notice a small chip, try to repair it as soon as possible. You can often fill it with a bit more base color and tip polish, then seal with a top coat. This prevents minor damage from worsening.
By incorporating these simple maintenance steps into your routine, you can enjoy beautiful French tip toes for longer, ensuring they always look salon-perfect.
Frequently Asked Questions about French Tip Toes
What is a French pedicure?
A French pedicure is a nail style characterized by a sheer pink or nude base polish and a distinct white line along the free edge of the toenail, mimicking the natural appearance of healthy nails.
How long does a French pedicure last?
Typically, a well-applied French pedicure can last between 2 to 4 weeks. Its longevity depends on factors like nail growth rate, daily activities, and adherence to maintenance tips.
Can I do a French pedicure at home?
Yes, absolutely. While it requires practice and precision, you can achieve a beautiful French pedicure at home using guides, stencils, or a steady freehand technique with the right tools and polishes.
What colors work best for French tip toes?
The classic is white, but modern trends embrace pastels, neons, metallics, and deep jewel tones for the tips. The base color is usually a sheer nude or pink, but variations exist.
How do I get a crisp white line for my French tips?
Using French tip guides or stencils is the easiest way for beginners. Alternatively, a fine-tipped brush and steady hand, or a liquid latex barrier around the nail, can help create a clean line.
Are French tip toes still in style in 2026?
Yes, French tip toes remain a timeless and highly popular style in 2026. While classic versions persist, modern variations continue to refresh the trend, keeping it relevant and chic.
How much does a French pedicure cost?
As of June 2026, a professional French pedicure in a salon typically costs between $35 and $75, depending on location and salon tier. DIY options can range from $30-$60 for a starter kit.
Embrace the Timeless Elegance of French Tip Toes
The French tip toe, in its classic and evolving forms, continues to be a cornerstone of sophisticated pedicure design in 2026. Its clean, elegant aesthetic offers unparalleled versatility, making it a go-to choice for any season or occasion. Whether you prefer the understated charm of the traditional style or the modern flair of colored tips and subtle embellishments, there’s a French tip toe design to suit every taste.
Mastering the technique at home is a rewarding effort, offering both cost savings and creative control. With the right preparation, tools, and a touch of patience, you can achieve salon-worthy results. Embrace the enduring appeal of French tip toes and let your feet step out in timeless style.
Information current as of June 2026; pricing and product details may change.
Source: Allure
Editorial Note: This article was researched and written by the Anarchy Label editorial team. We fact-check our content and update it regularly. For questions or corrections, contact us.
Related read: Ulta Coupon 2026: Score Beauty Deals & Save Big.


